REVIEW – LEGOs and other building blocks have the amazing ability to bring things to life. This new set from JMBricklayer highlights this as well as any out there. You remember the story of Pinocchio, the enchanted marionette whose nose grew when he lied, right? The Puppet Show creates a larger-than-life version of Geppetto’s finest handiwork suitable for display.
What is it?
The JMBrickerlayer Puppet Show is a LEGO-compatible building block set (model 70002) that features a wooden shelf; on one side is a small stage and on the other is Pinocchio sitting down. This set contains 1900 pieces, mostly in shades of brown along with bright yellow, red, and blue. It includes a set of stickers. Most of the pieces are smaller, and a few are similar to LEGO Technic pieces. JMBricklayer’s motto is “Joy Makes Brilliance,” and their mission is to help builders “reap the rewards of their ideas.”
What’s in the box?

- 1900 pieces
- A brick separator
- A 97-page manual
- A sheet of stickers
- A battery brick wired to a small LED brick
- Four pieces of string
Design and features
When it comes to the design of LEGO alternatives, there are a handful of questions that always need to be answered:
Are they compatible with LEGO? Yes, the bricks in this set are perfectly compatible with LEGO bricks.
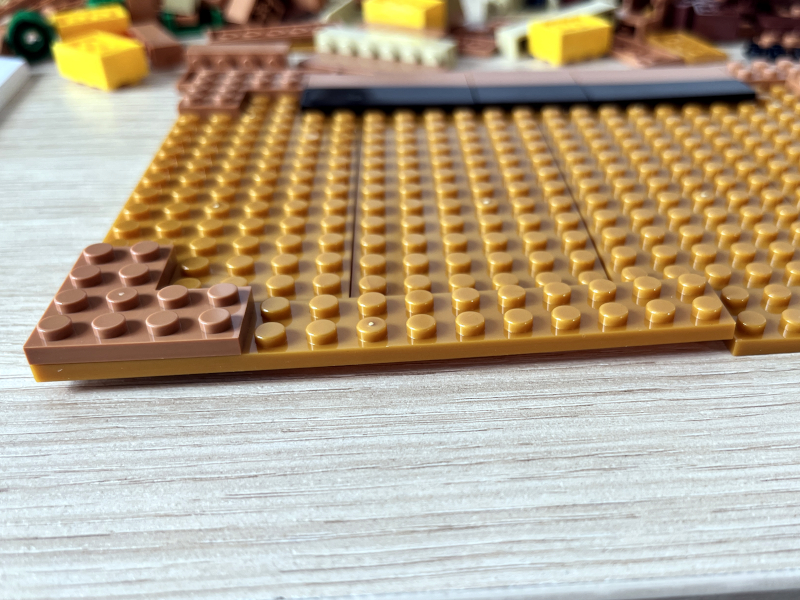
Are they of the same build quality? No, they are a lesser quality brick. The vast majority of the bricks, especially the smaller ones (2×6 and down), are of nearly the same quality as LEGOs. There are, however, several large, golden flat pieces that are of poor quality; when I set them flat on my table, I can visually see the warping in them. These formed the foundation of Gepetto’s workbench and were covered with other bricks that eventually straightened them, so this did not impact the final build. Additionally, I often noticed that there were small gaps between some of the bricks. This set is made by Wekki—JMBricklayer is the distributor—and their tolerances are not perfect.
Do they fit tightly, or do they come apart easily? These bricks fit together very tightly. I had no problems at all with pieces coming apart.
Are they cheaper in cost than LEGO? Yes, they are anywhere from 32 to 62% cheaper. Looking through LEGO’s website, I found four different sets that have about the same number of pieces and that bring something to life:
- The PAC-MAN Arcade has 1755 pieces for $269.99, which equals 15.3 cents/piece.
- The Typewriter has 2079 pieces for $249.99, which equals 12 cents/piece.
- The Globe has 2585 pieces for $229.99, which equals 8.8 cents/piece.
- The Chewbacca has 2319 pieces for $199.99, which equals 8.6 cents/piece.
In comparison, the Puppet Show 1900 pieces for $109.99, which equals 5.8 cents/piece. If you’re looking to give someone a fun building block set and save some cash in the process, this is a good set.
How do the instructions compare? I really like these instructions. They dimmed out previous steps to make it easy to see where to add the new bricks, but the dimmed-out steps are still in color. They also frequently note the size of bricks (e.g., 4×8) and provide a way to measure out some bricks. The steps often use many more bricks than LEGO instructions–this keeps the size of the manual down–but I never found this to cause mistakes. The colors are fairly accurate, too. The manual has 416 steps, and each section shows you what the finished section will look like before you begin, a nice touch. There are also places where there are special instructions in English that help ensure that the builder does something correctly; I appreciated these extra hints. Anyone familiar with LEGO will have no problem using these instructions.
Setup
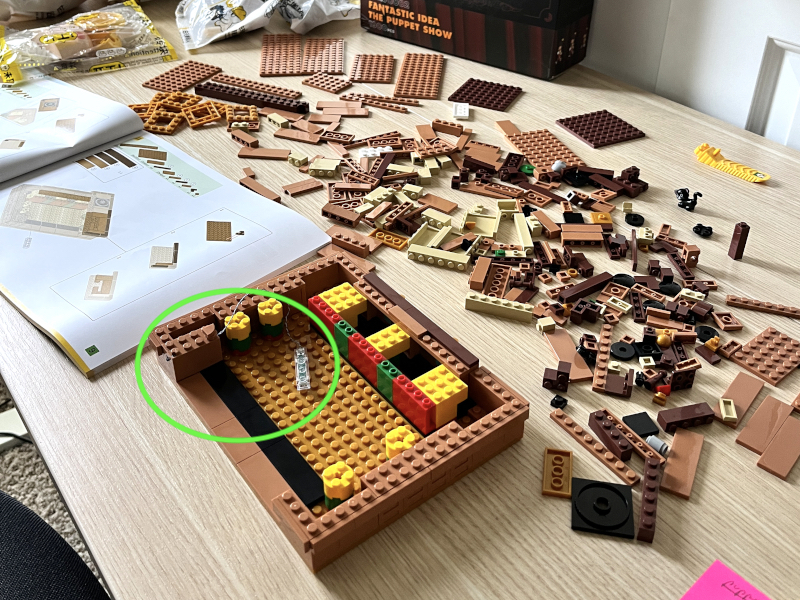
There are five major sections in the manual, for each part of the build. Each of the plastic bags of brick has a corresponding number on it, making it easy to find what is needed. One of the bags contained the sticker sheet, which was a mistake, as this completely crumpled them. JMBricklayer should require Wekki to put the stickers in the book; until that happens, plan on using their support page to request replacement stickers.

Section one builds Geppetto’s workbench and part of the stage. Within the first few steps, I saw the warping in the large, flat, golden pieces; thankfully, these form the base of the workbench, and the addition of many other pieces forcefully straightened them out so that there was no overall impact. I also noticed some small gaps between the pieces, but these were minor cosmetic issues. I also noticed that the colors of the bricks do not match traditional LEGO colors. The blue, red, and yellow bricks are noticeably brighter than expected. This isn’t necessarily a bad thing, as they look great, but it is a change in quality.
The light makes its appearance in this section. The block containing the switch and the battery are part of the workbench, and the lights themselves (two little LEDs) will eventually be added to the small stage.
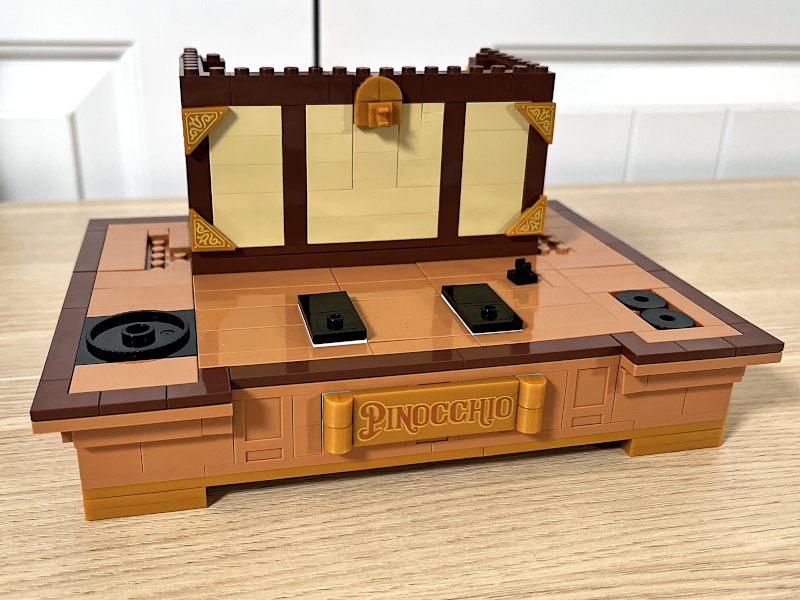
This is the finished section one; it’s the finished workbench, and sitting on the back of the workbench are the walls for the stage. At this point, I can already see two trends that will be prevalent in this build. One, the designer makes heavy use of the SNOT technique; building bricks will be added to all sides. Two, everything has a smooth, finished surface on it; very few studs are left showing.
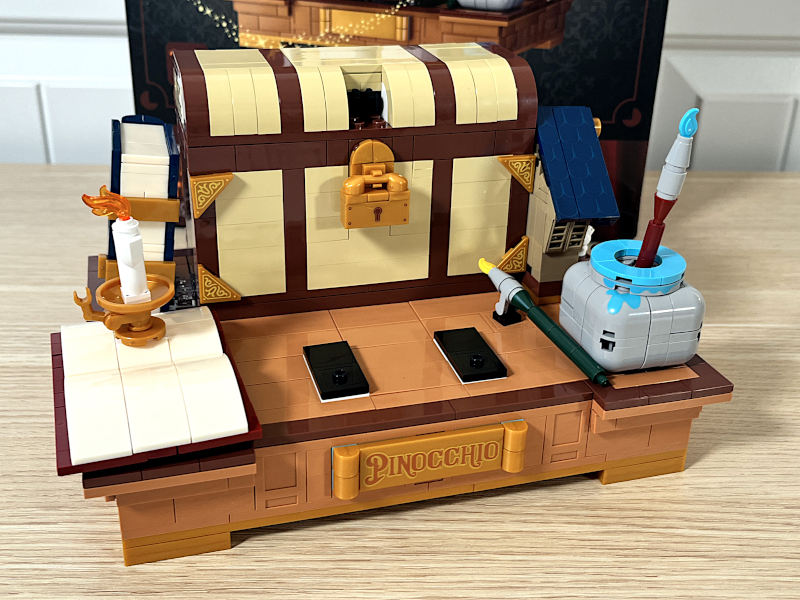
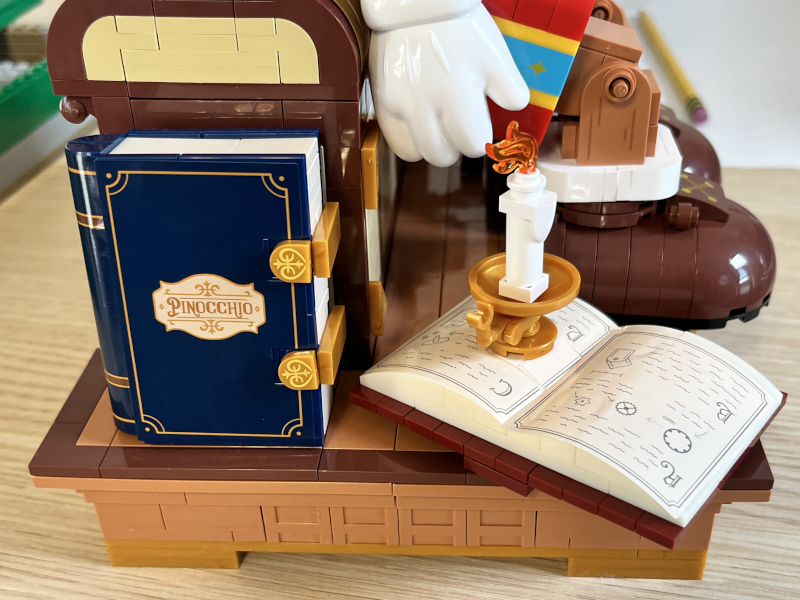
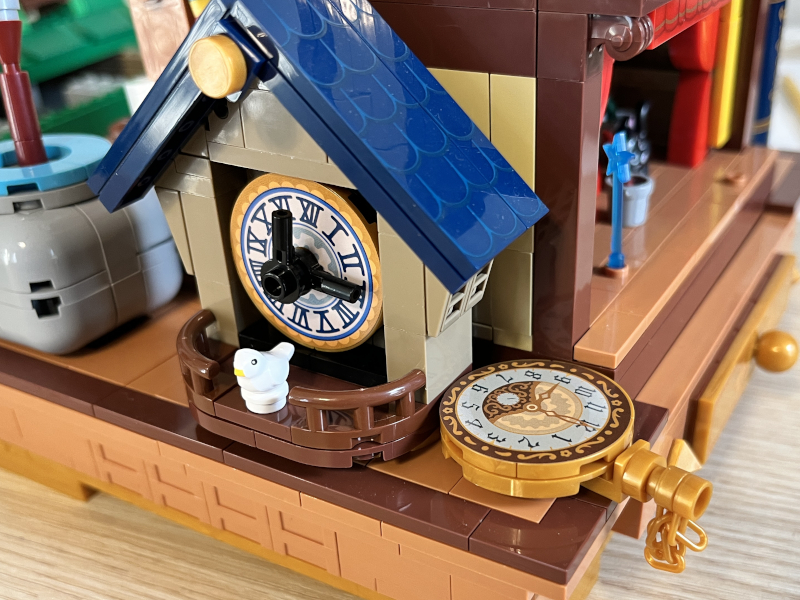
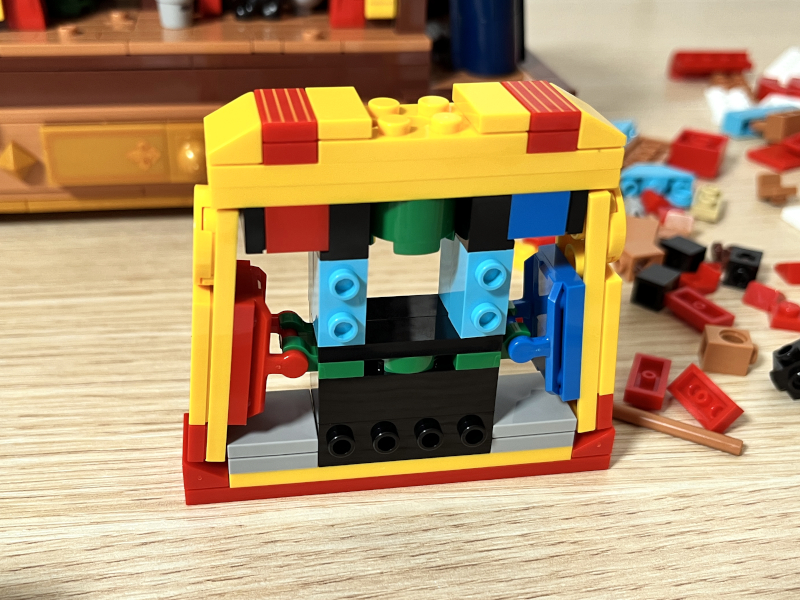
Section two finishes the stage and adds other items to the workbench, including his paintbrushes and books.
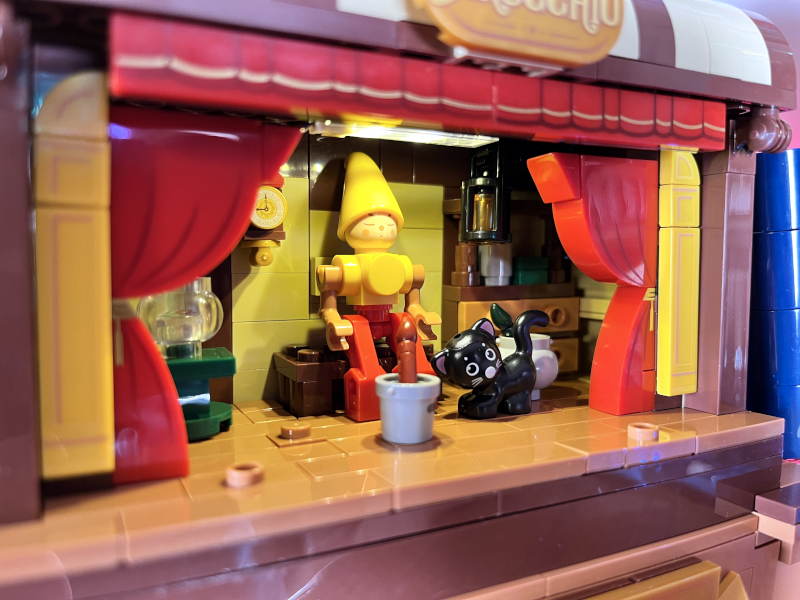
It also reveals something rather interesting, something that is not at all obvious while looking at the picture on the box: Sitting on the front of the workbench will be Pinocchio; what he’s sitting on, however, is a small stage. When I turn the bench around, I see everything necessary for the wannabe-puppeteer to put on his own performance: Curtains, lights, a puppet, a clock, brushes, and even a cat. Cool!
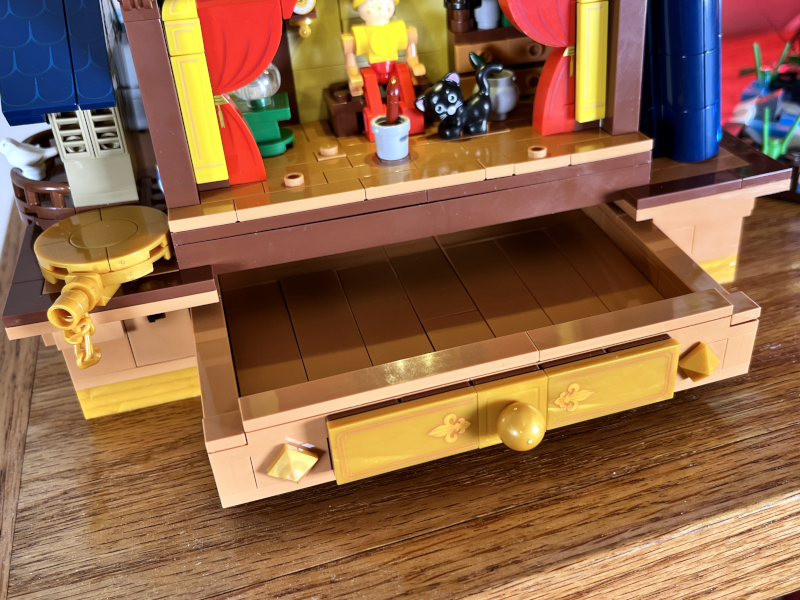
Even less obvious is the drawer built into the workbench. This stage reveals an odd design: When I look at Pinocchio, I don’t see everything built into this set. My attention will be on the puppet, but there’s an entire world hidden around back; sadly, it’s a world that no one will ever see, unless I purchase some sort of powered, rotating base. If Wekki is going to go through the trouble of building this magnificent-looking stage, I think they should also build a rotating base (made of bricks) to show it off!
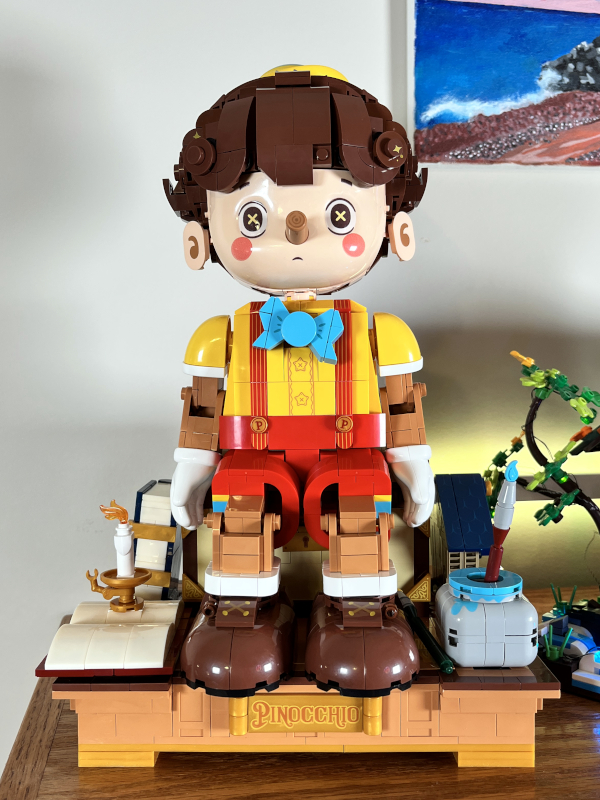
Section three builds Pinocchio’s chest and legs, and this is where the designer did some of his finest work. This is the carcass of the chest, and already we see that we will be adding pieces on five sides.
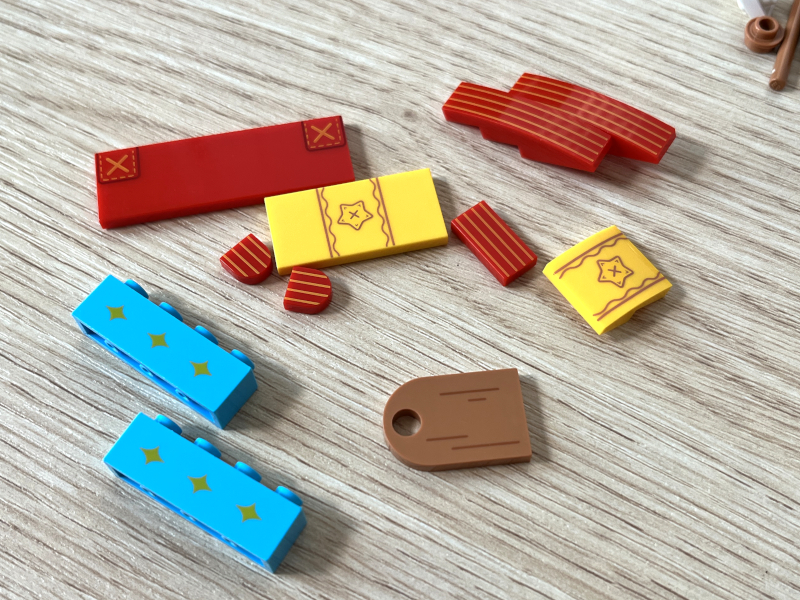
We also see that many of the pieces have a printed pattern on them, which I think is better than stickers.
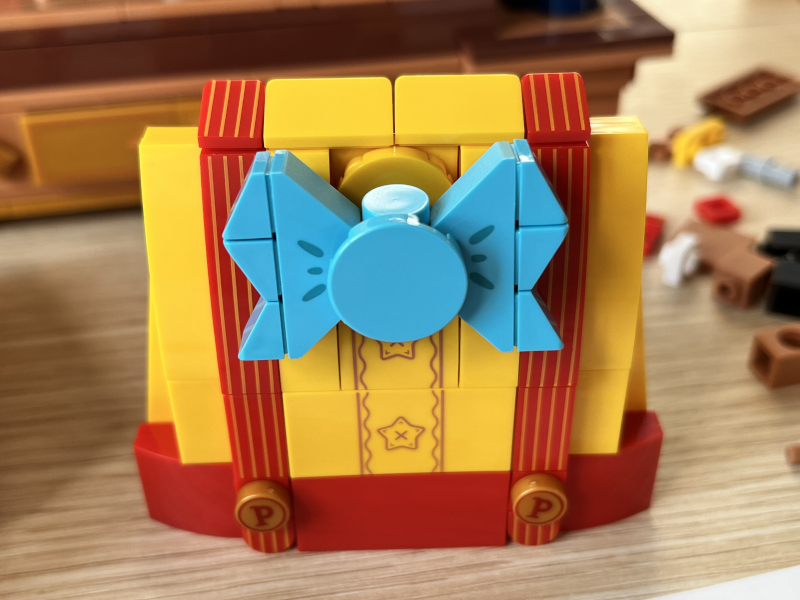
Check out this bowtie, which was done so cleverly.
These legs are amazing. They have a nice range of motion in the hip and knee, and yet they are strong and well reinforced. This is good work by the designer.
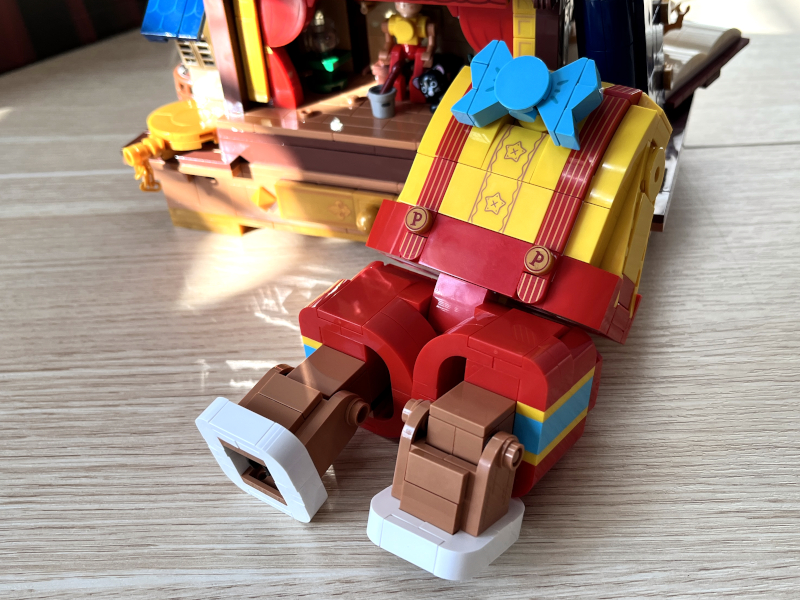
Honestly, this is some of the best construction that have seen in any building brick design. It’s realistic-looking, makes great use of colors, and is flexible and yet solid. I’m impressed.
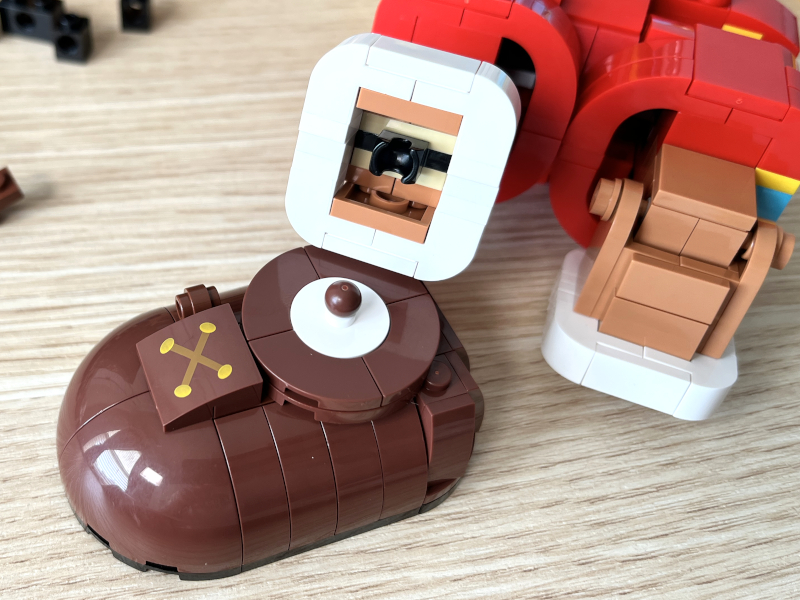
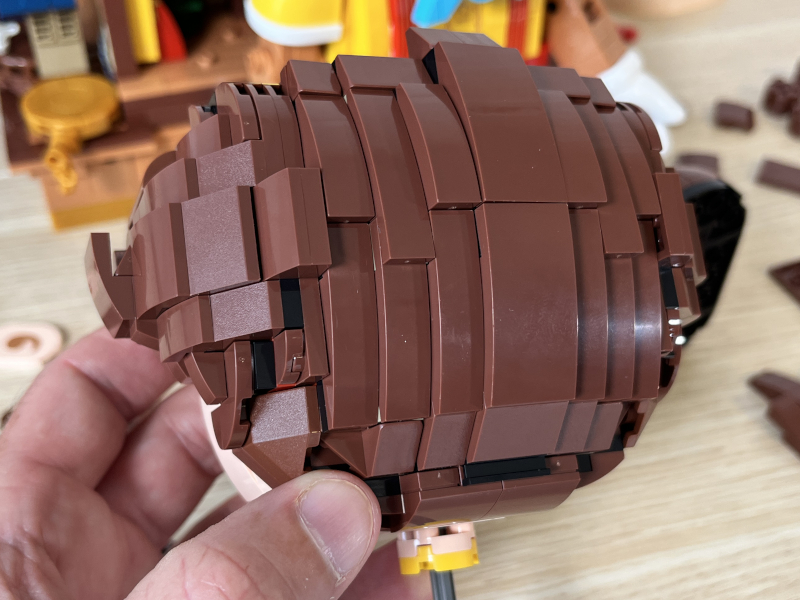
Section four adds his arms and feet and then starts the head. The shoes for the feet are spot on, and they even use a socket for some range of motion. The designer of this set has continued to do a great job of hiding all the studs.
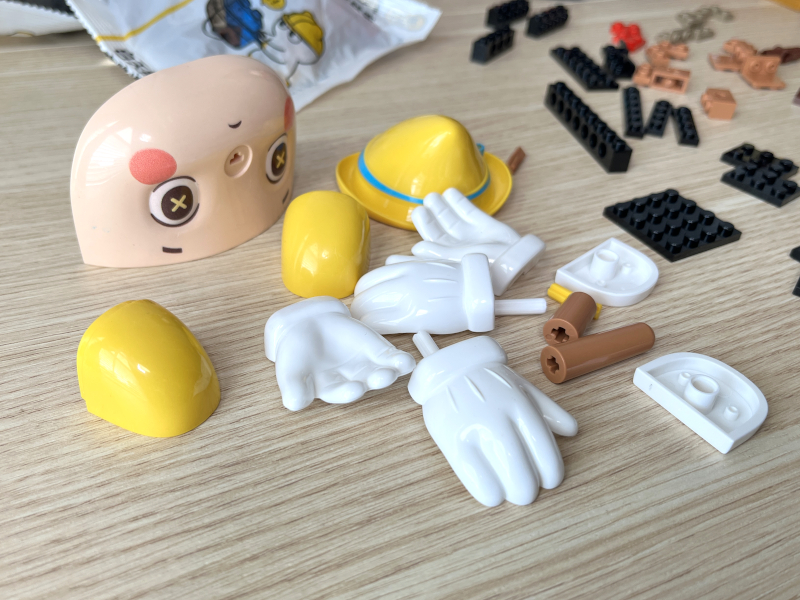
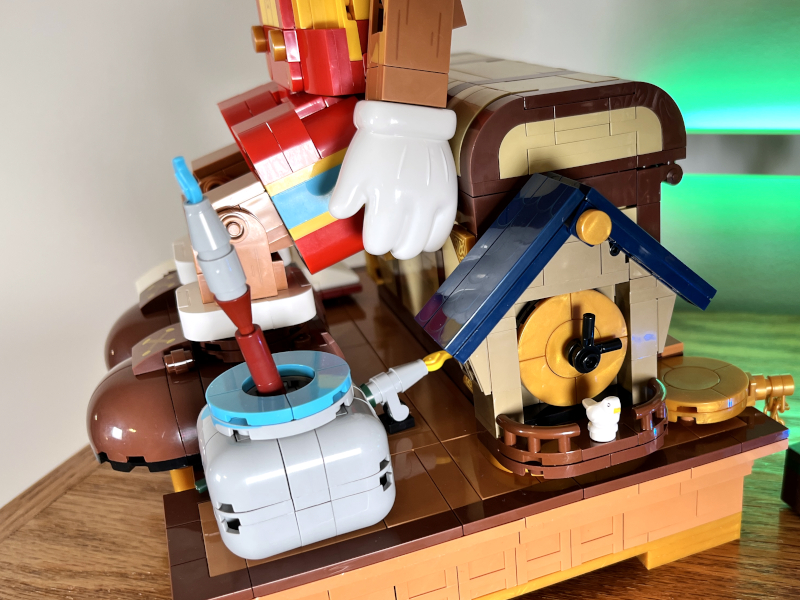
And right here is where we get to the worst part of the set: I found these huge molded pieces for the face, hands, shoulders, and hat. I am so disappointed by these pieces. The designer of the Puppet Show is clearly a master builder, so why ruin a good design with these huge, fake pieces? C’mon! Keep doing what you’ve been doing! Build with building blocks! I really believe Wekki needs to do a version 2 of this set and do this part right.
This is the end of section four, and the body is completed except for the head, which is still mostly a shell.
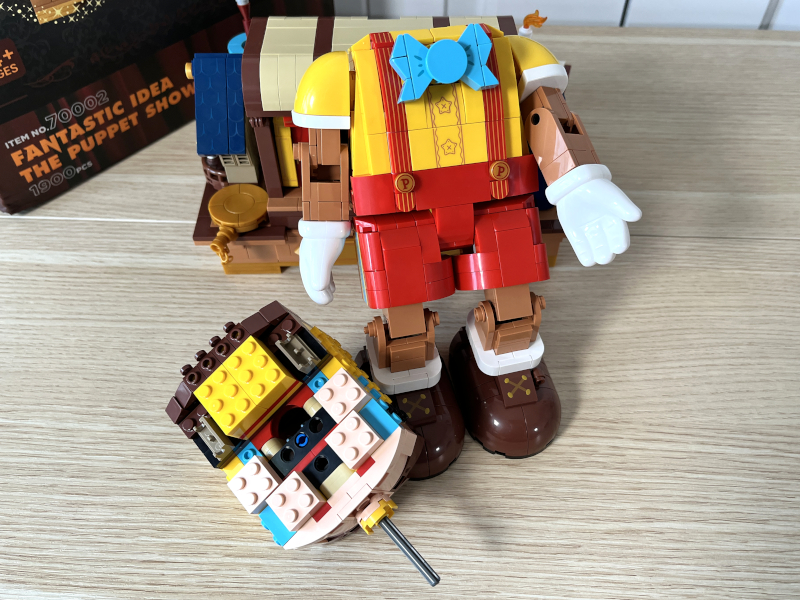
Section five finishes the head and, optionally, builds the marionette controller. The first part of this was assembling each of the various portions of hair and attaching them to the head. It seems like these would be fragile, prone to falling off, but they were always stable. I’m amazed at how good this hair looks.
One little nice touch when finishing the head: There are two different size noses, one shorter and one longer. I elected to put the shorter one in.

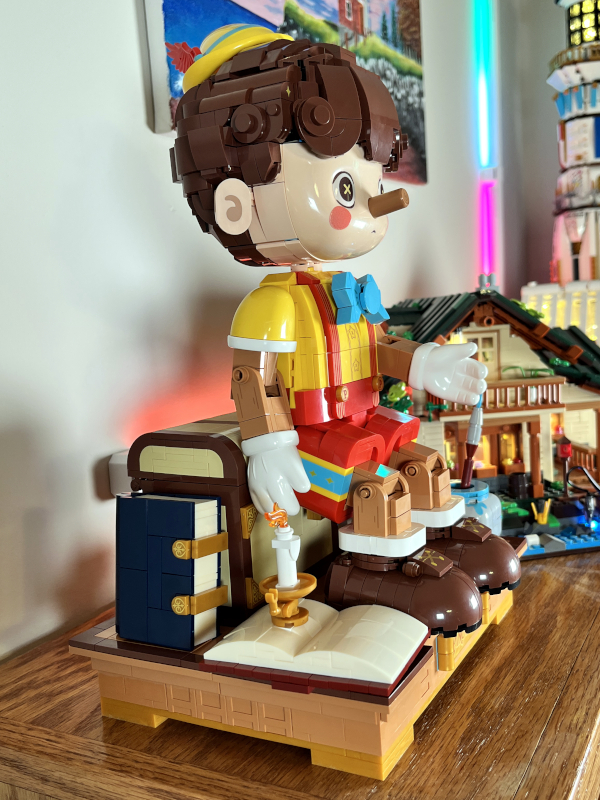
Here was the moment of truth, the step where I had to connect to puppet to the base. This is the step were many brick sets have problems with stability (like the t-rex). The back of the puppet has a single connector, and the feet press down on the workbench. I’m pleased to say that this worked great! It is stable and doesn’t feel like it’s about to fall over.
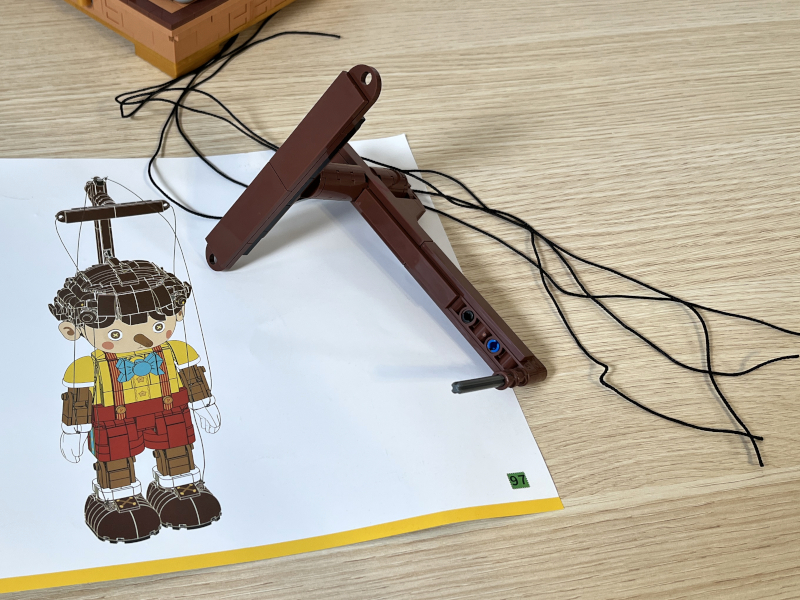
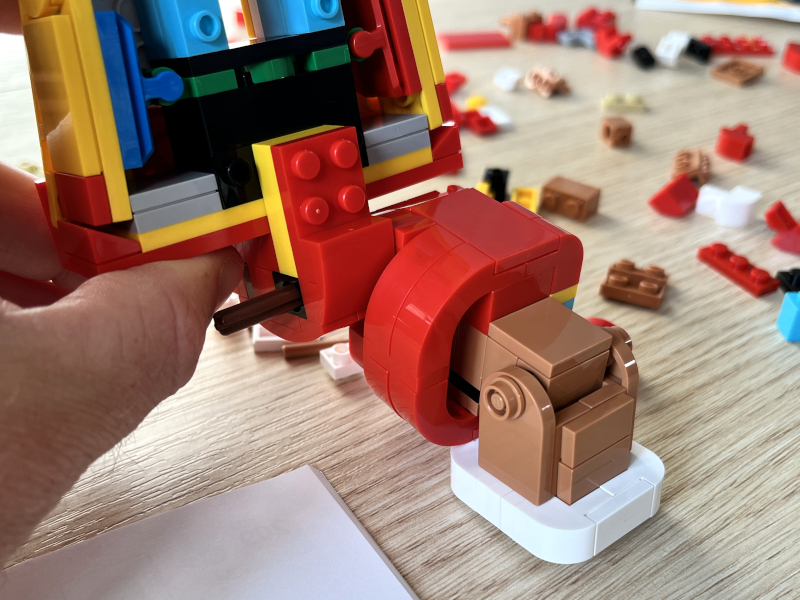
At this point, the core build is done. There is an optional step to build a marionette controller, which can be used to control Pinocchio like a puppet. While I built the controller, I chose to not connect it and all the strings to Pinocchio. The building bricks seem too heavy and awkward to actually control like a real puppet.
Performance

Overall, I really like this Puppet Show set. Pinocchio has been brought to life in splashes of bright colors and sits on my shelf. Nobody who walks into my office will have any doubt about who this is. The design is masterful, the exterior is smooth and attractive, and the entire structure is solid. I wish they had not used the large molded pieces, especially for the face, but it does work.

I’m less certain what to think about this stage on the back. It’s detailed and cool, but I feel like no one will ever see it or appreciate it, as there’s no way to rotate the workbench around. I think Wekki either needs to remove this and just have Pinocchio sit on a chest, or they need to add a rotating base. For now, this will remain our little secret.
What I like
- It’s Pinocchio!
- Skilled and clever design
- Stable structure
- Fabulous instructions
What I’d change
- Use building bricks instead molded pieces
- Add a rotating base
- Add the cricket!
Final thoughts
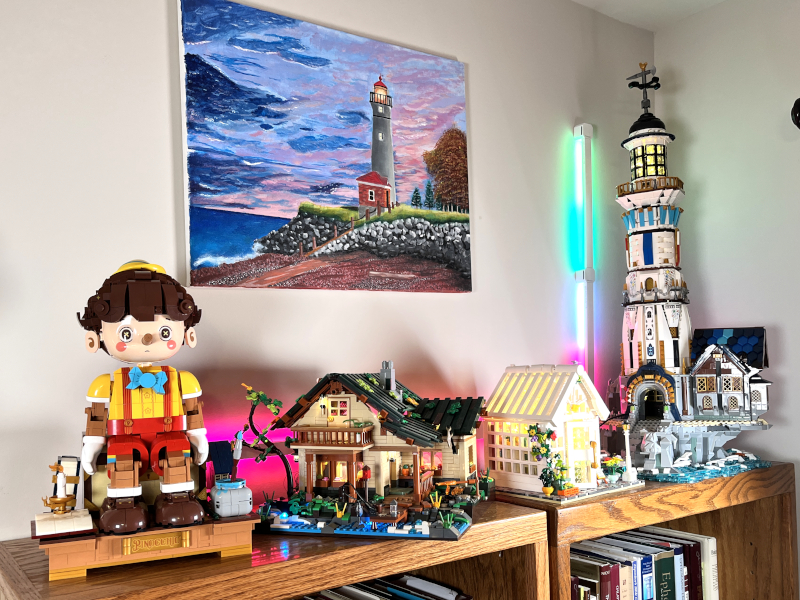
The JMBricklayer Puppet Show is a building brick set that has Pinocchio sitting on a chest atop Gepetto’s workbench. Concealed within the backside of the chest is a miniature theater with a puppet and a cat. This set has been skillfully designed and is both beautiful and stable, and it’s also cost-effective compared to similar sets from LEGO. This set has earned a coveted spot on my bookcases. If you’re into classic stories and love LEGOs, then I recommend picking up this set.
Price: $109.99
Where to buy: JMBricklayer’s online store (Save 15% with code: VIPGAD15 expires 12/31/2023) and Amazon (Save 15% with code: VIPJUALIE15 expires 10/19/2023)
Source: The sample for this review was provided by JMBricklayer.
Update (Sept 16, 2023): I noted in the review above that the stickers arrived all crinkled, so I didn’t add them. JMBricklayer promptly sent out another sheet, and I put them on this morning. They primarily help with the two books on the left of the workbench and the faces of the clock and watch on the right. They are nice additions, and I’m glad that JMBricklayer sent them my way.