REVIEW – My house has a very common problem: My HVAC doesn’t cool and heat all rooms evenly. The master bedroom is on one side of the house and is right under the HVAC system, and my office is on the opposite side of the house. In the summer, the master bedroom is too cool and my office is too hot. In the winter, I have the opposite problem. I am testing Flair’s Smart Vents to see if they can help rectify this situation.
What is it?
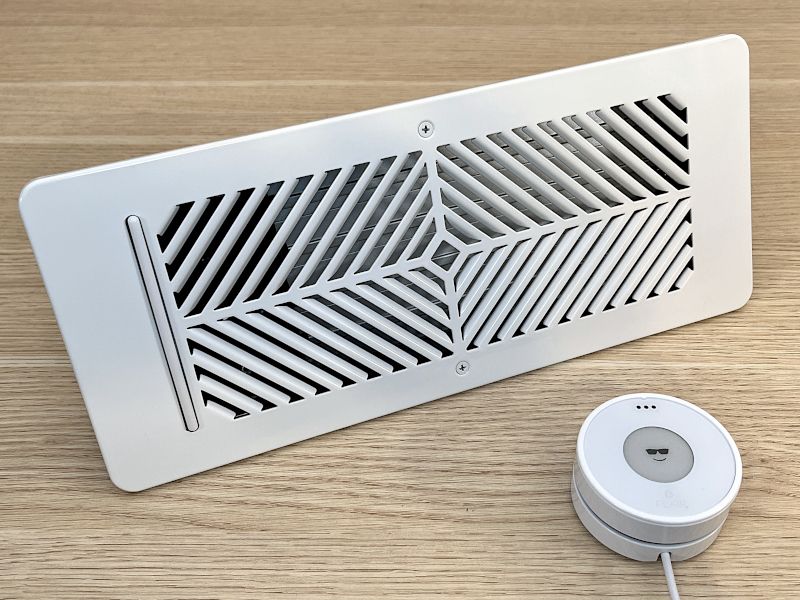
The Flair Smart Vents are vents that can be installed by homeowners and intelligently open or close to direct more or less airflow where it’s needed when it’s needed. They are intended to be easy to install and easy to configure. The brains behind the vents are Flair Pucks, which combines a sensor, a controller, and wireless communication into one little package. Flair’s mission is “to bring meaningful energy reduction while improving comfort in people’s lives.”
What’s in the box?
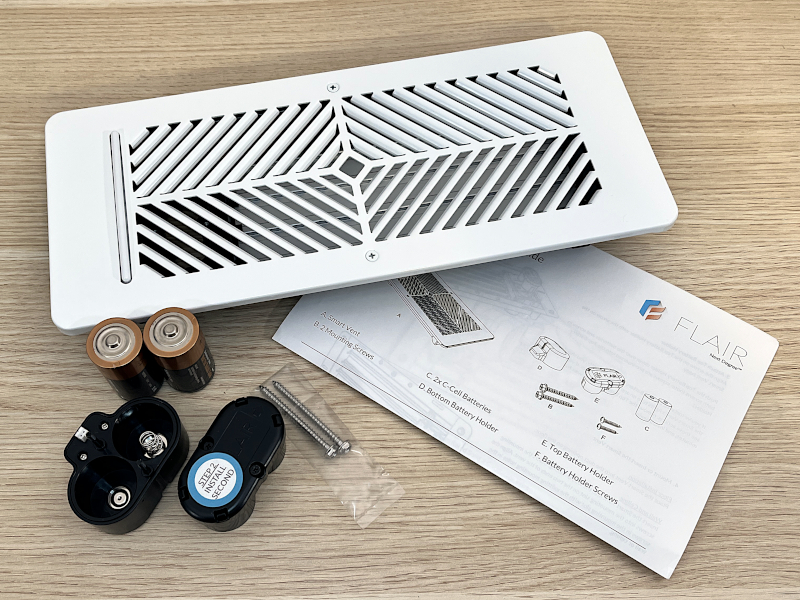
Each vent box comes with:
- One vent
- One battery holder
- Two C Duracell batteries
- Two mounting screws
- One installation guide
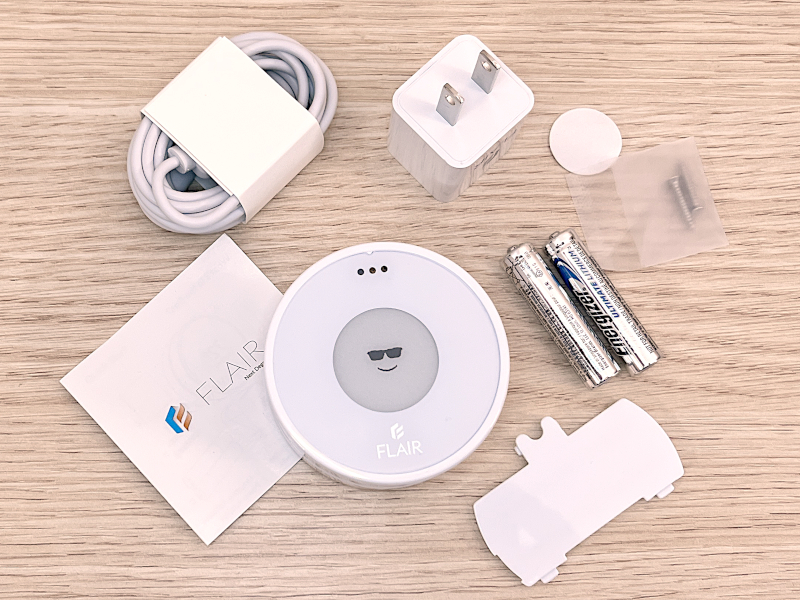
Each puck box comes with:
- One puck
- One USB cable with power supply
- Two AAA Energizer batteries
- Two mounting screws
- One mounting adhesive
Specifications
The specifications for the vents:
- Sizes: 4×10, 4×14, 4×12, 6×10, 6×12, 6×14 inches
- Color: white
- Material: metal
- Connectivity: 915 MHz radio
- Power: two C batteries or wired installation
The specifications for the pucks:
- Size: 2.5 inches in diameter by 1.25 inches deep
- Color: white
- Material: plastic
- Connectivity: 2.4 GHz Wi-Fi and 915 MHz RF
- Power: USB or two AAA batteries
Design and features
The Flair Smart Vents look like ordinary vents from the outside; the pucks look like the smaller cousins of the Nest thermostat. What makes these vents unique is that they can be opened and closed remotely and automatically by a puck. The pucks, in turn, are controlled by the Flair app, which will allow me to define the temperature at which I want the vents to be opened or closed.
Installation and setup
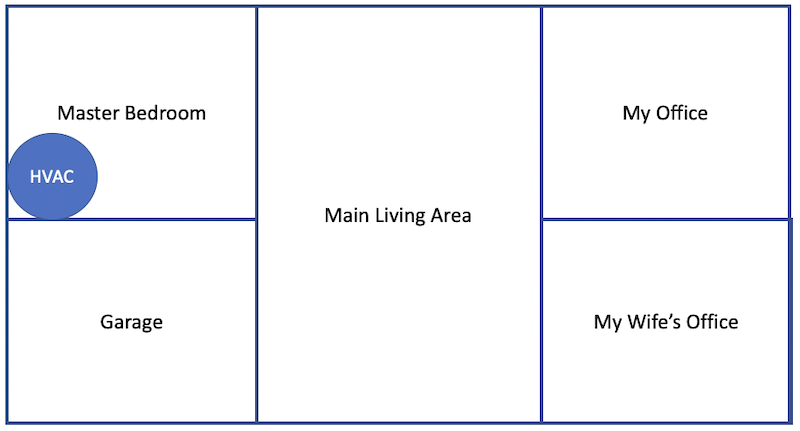
The first step in the process is understanding what problem I am trying to solve. At the risk of oversimplification, this is my house. As you might expect, more cooling and heating get into the master bedroom than in my office. What I need is a way to control the airflow in the master bedroom and my office.
The second step is to plan a solution. I had an opportunity to speak with two of the employees at Flair, and they helped me to come up with a plan. I am going to replace both of the vents in my office and both of the vents in the master bedroom with Flair Smart Vents. When my office is too warm in summer, I will close the vents in the master bedroom; when it’s too cool in winter, I will close the vents in my office.
The pucks have an RF range of about 30 feet, though that can vary depending upon the construction material of a house. According to the floor plan of my house, it’s 54 feet from one side to the next. Maybe I could get away with only having one puck in the center of my house, but to be safe I should get two, and put one in my office and one in the master bedroom.

To make this happen, Flair graciously sent me four Smart Vents and two pucks. When I opened the boxes, I found everything was well-protected.
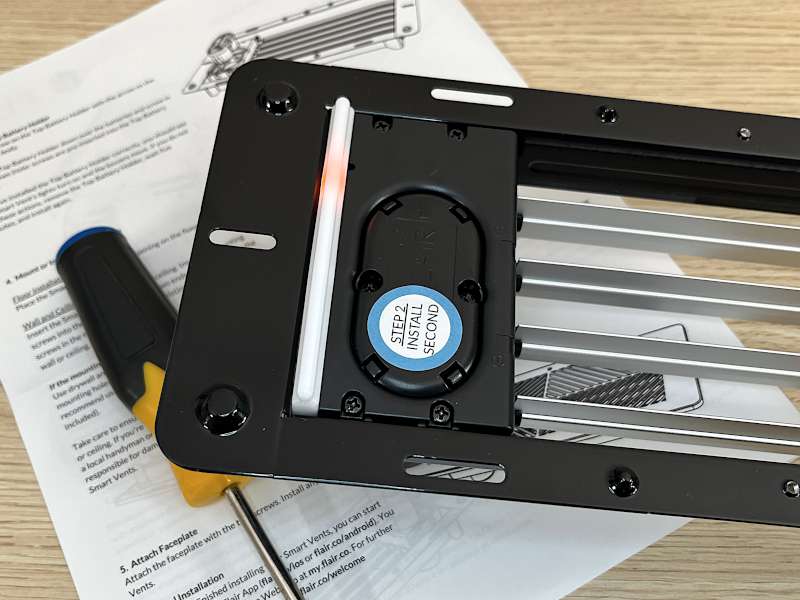
The third step is to assemble the four vents. I found Flair’s instructions to be well-written and clearly illustrated. I installed the batteries and the battery housings into the vents. Unfortunately, of the four vents that I assembled, I found that the C batteries were dead in two of them. While I am happy that Flair includes name-brand batteries (Duracell), I wish they would add some quality control to their process to ensure that they are shipping functional batteries.
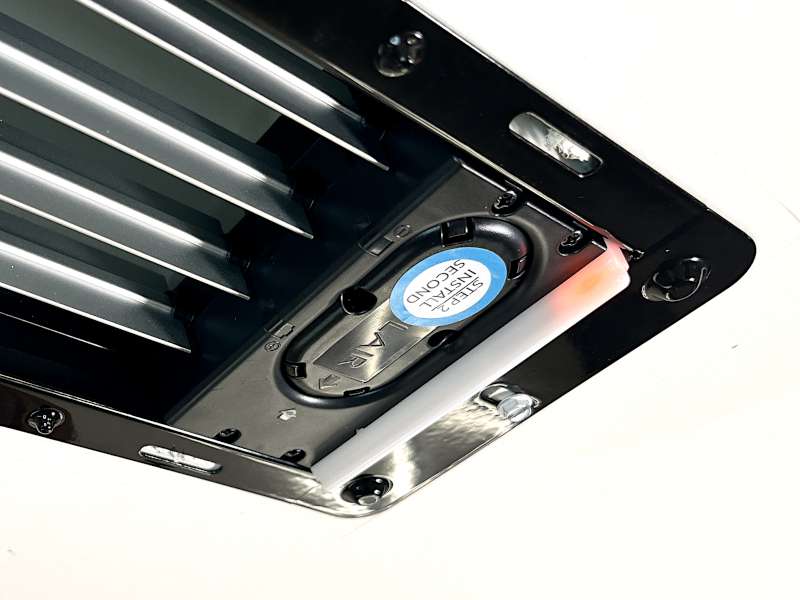
The fourth step is to replace the existing vents in my office with new ones, and this is where I encountered a couple of problems. One, the shaft of the new vents, the part that fits up into the duct in my ceiling, is a full quarter-inch wider than the old ones. One of the new vents wouldn’t fit into the duct. I had to get a pair of pliers and bend the metal in the duct.
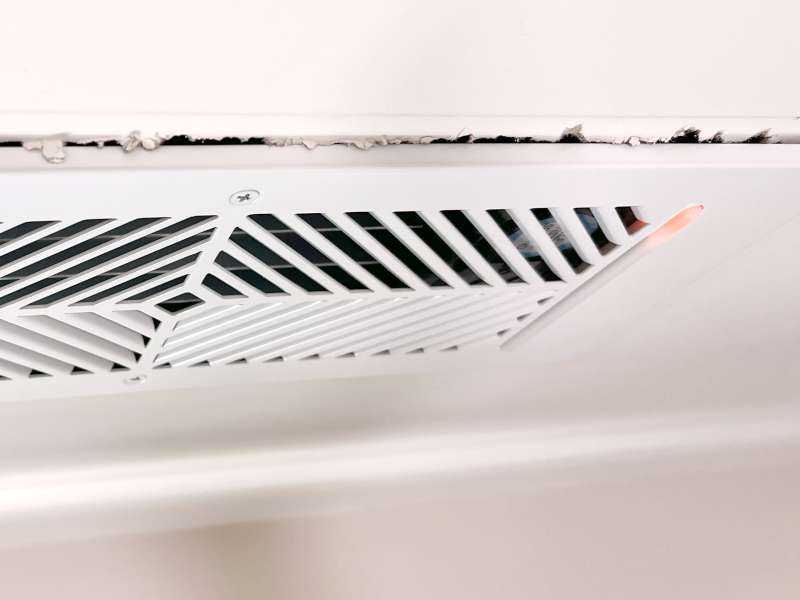
Two, the cover of the Flair Smart Vents is about a half inch narrower than those of my old vents. In one vent, the drywall cuts were exposed because Flair’s vents were so narrow, leaving a rather ugly look. None of these problems are insurmountable, but the point is that anytime I tackle a DIY project—installing Flair vents is a DIY project—I should be prepared to do some extra work to get everything looking and working right.

At this point, it might be helpful to stop and understand how a Flair system communicates. The vents talk to the pucks (aka sensor pucks) and the pucks to each other via radio (RF). One of the pucks also functions as a gateway puck, a hub that connects the entire set of Flair gadgets to the Wi-Fi router and thus out to the Internet. Unfortunately, Flair chose to create their own networking protocols and standards instead of supporting industry standards, like Thread and Matter, that would make their products compatible with a host of other smart gadgets. This is a huge negative in my mind, and a reason to consider passing on these vents. I would like to see Flair join the leaders of the smart home market, including Apple, Amazon, Google, and Samsung, who have created these open standards. Though these standards are still in a time of transition, there are dozens of compatible gadgets that are already available.
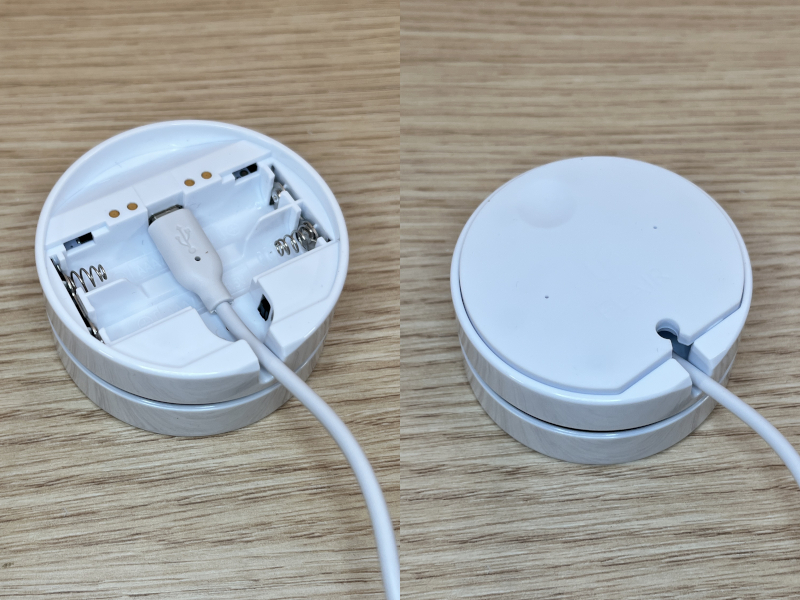
Once two of the Flair Smart Vents were installed in my office, it was time to setup a puck. I want the puck in my office to function as the gateway puck, since my Wi-Fi router is also in my office. A puck can be powered by AAA batteries, allowing them to be put anywhere in a room, but a gateway puck must be plugged it. I connected the antiquated USB micro connector to the puck, put the back on, and then plugged it into an outlet. The puck displayed two values, the actual temperature in the room and the desired temperature, which can be changed by rotating the outer ring. Although the puck was working, it was not connected to the vents. The puck installation manual is not very helpful here; the vent manual, however, indicates that the next step is to install the Flair app on my iPhone.
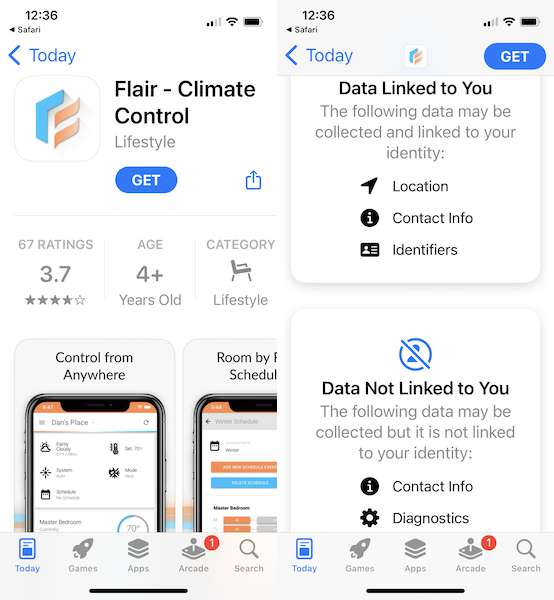
The Flair app can be found in the Apple Store—there’s an Android version as well. Unfortunately, Flair is one of these companies that collects a lot of data that they don’t need to collect. As I configured the devices, it repeatedly demanded that I provide the location of my house, allow them to track my location at all times, reveal the brand of the thermostat that I own, and so forth. They also require that I create an account and give them my name and email. Absolutely ugh! I shouldn’t have to supply all this info just to open and close vents in my own home. I want to see an option in their app that says, “Back off! My personal information is none of your business! Just open and close the vents based on the temperature in my house!” I wish this company was more respectful of my privacy, and this is another reason to consider passing on these products.
After I created an account, the app started a wizard to help me configure my gadgets:
- Selected my puck and converted it to a gateway puck.
- Connected my iPhone to the Puck’s Wi-Fi.
- Gave my puck access to my Wi-Fi network; I chose our guest network rather than our internal network.
- Waited for the puck to start communicating with Flair’s servers.
Flair’s Smart Vents can be connected to a smart thermostat, like my Ecobee 3, but they can also work without connecting to a thermostat, which is required for homes with standard thermostats. I might eventually add the Ecobee, but I initially want the vents and pucks to work on their own, just to see how they perform. The setup wizard, however, required that I configure a thermostat. This left me confused because if I was not going to connect it to my thermostat, I didn’t see any reason to do so. I selected some random information to appease the wizard and then continued:
- Connected my puck and my vents. It’s kind of cool, Flair uses a unique pattern of lights on each vent to distinguish one from another. This is how I know which vents to assign to which rooms.
- Created a room for my office and added the vents and puck to it.
- Selected the system mode. I determined that manual mode means that I can manually use the pucks to open and close my vents, and auto means that I can configure the Flair app to automatically open and close them when certain temperatures are reached. I selected auto.
- Selected what to do when I’m away. Flair not only wanted to know my house’s location, but it also wanted to know my personal location at all times, so it could decide how to open vents accordingly. I don’t want Flair to know when I’m home or away, so I didn’t do anything with this.

Finally, I was done setting up the vents and puck in my office. Since I didn’t want to connect a thermostat, I deleted it from the app. At this point, there are no instructions on the app on how to actually use the app, so I began to experiment with it. I could only find two settings that I could adjust. One, is my thermostat cooling or heating? I set this to cool, since it’s summer. Two, what is the desired temperature in my office? I want it cool, so I set it to a very low 70 degrees.
Now that my office was setup, it was time to setup my master bedroom. I created another room in the app called bedroom and assigned the remaining vents and puck as belonging to it, as every device must be in a room. Then I moved the puck and the vents into my bedroom, though I hadn’t actually installed the vents into the ceiling yet. I plugged the other puck into an outlet to avoid battery problems. It’s ready for more testing.
As I looked through app, I observed three things that seemed problematic. One, the app was constantly complaining that I did not have a thermostat configured. Two, the pucks struggled to communicate with each other, probably because the distance between the pucks was greater than 30 feet. Three, I couldn’t find any way to setup an automation to close the vents in my office. In my mind, I was expecting the Flair app to act like the Home app on my iPhone. I wanted to create a little automation that says, “If the puck in my office detects that the temperature in the office is greater than 76 degrees, then close the vents in the bedroom.”
Not knowing what else to do, and not finding the online documentation to be helpful for my concerns, I contacted Flair again to speak with their support. They provided help for all three of my problems. To solve the first problem about the thermostat warning, I had to setup a thermostat again. Even if I don’t have a smart thermostat or don’t want to connect to it, the app still requires one. I set one up again using random information, and put it into a new room, when I called Center, as the thermostat is in the center of my house. Then I added both of the rooms to that thermostat, because every room is supposed to be tied to a thermostat. At this point, the Flair app was happy.
To solve the second problem about puck communication, I could do one of two things. Because the range of the pucks is so short, I could add a third puck, putting it into the central room in my house, and it would relay commands between the other two; at $119, this is a pricey solution. (I can’t help but feel once again that it’s unfortunate that Flair doesn’t support an open standard like Thread. I have multiple Thread devices in the house from Apple, Eve, and Nanoleaf that form a mesh network, and connecting to this network would have instantly solved this problem.) I could also convert the puck in my bedroom into a gateway puck—it turns out that it’s ok to have multiple gateway pucks—and it would communicate directly to the Flair servers online. The only requirement is that I keep this puck plugged in, something that I have already done. This worked for me, so I made converted it from a sensor puck to a gateway puck following these instructions. As a side note, Flair has a lot of good documentation online on their support page; you just have to get good at searching and finding what you need.
To solve the third problem about the automation, I needed to reorient my thinking. In other words, I was expecting to control the vents based on the desired temperature in my office, but Flair only works by controlling vents based on the desired temperature in the room in which the vents reside. I expected to say, “Close the bedroom vents when the office is too hot,” but Flair requires me to say, “Close the bedroom vents when the bedroom is too cold.” I expected to directly control my office, but Flair wants me to indirectly control it. Once Flair had straightened out my brain, I had to set the threshold temperature for the vents in my office to something low, like 72 degrees. This assures that the vents will stay open all the time (at least during the summer). Then I had to set the threshold temperature for the bedroom to something higher, like 76 degrees. Whenever it gets that cool, which it easily does, then it will close the vents, thus pushing more air into my office.
At this point, I went ahead and installed the remaining vents in the bedroom and made sure that everything was configured as Flair recommended.
Performance
Does it work? The answer is yes, most of the time.
It’s a bit of trial and error to see what the right temperature for my bedroom should be. I set it at 76 to start and then raised and lowered it to see what temperatures I got in my office. I eventually found a threshold that worked pretty well. As I watched the temperatures in my house rise and fall, I have to say that Flair’s smart vents do a pretty good job. During the day, I think they kept the temperature in my office down a couple of degrees more than what it was previously, and that’s a big improvement for me!
Finding the right temperature was pretty easy for two rooms, but I suspect this becomes quite the juggling act for a house with multiple rooms filled with smart vents. It’s also worth noting that it’s all or nothing; in other words, all the vents in a room have to be opened and closed together. I can’t close one if it gets to one temperature, and then both if it gets to another temperature.
Right about here is where the Internet went out. An AT&T tech was working on the fiber connection to a neighbor’s house and in the process accidentally bumped the fiber cable going to my house. We lost Internet for three days. (Thank you, AT&T!) When the Internet went out, all the vents promptly closed; a while later they all opened up. When AT&T finally got around to fixing the connection, the vents all closed once again. For some reason the puck in my office claimed it was 68 degrees, while the HomePod mini said it was 79; of course, this kept the vents closed when I really needed them to be open. It took the puck about an hour to finally sense the right temp, and then everything went back to normal.
This unfortunate event made me realize how very dependent Flair’s little gadgets are upon their apps and servers. When the Internet is down, there’s nothing I can do to control them. There are no physical buttons or levers to manually override the vents when I need to. This is not a good thing, and it’s not a uniquely Flair concern. If Flair ever shuts its doors, as other companies have, then I would have hundreds of dollars worth of bricked devices.
It’s worth noting that this dependency upon the apps and the Flair servers is an intentional design decision on their part. The more brains that are in the cloud, the easier it is for Flair to update the software; the pucks and vents can essentially remain as (comparatively) dumb devices, removing the need for complex firmware updates. It’s an understandable choice, and one that works well enough, at least until more AT&T techs come to my neighborhood.
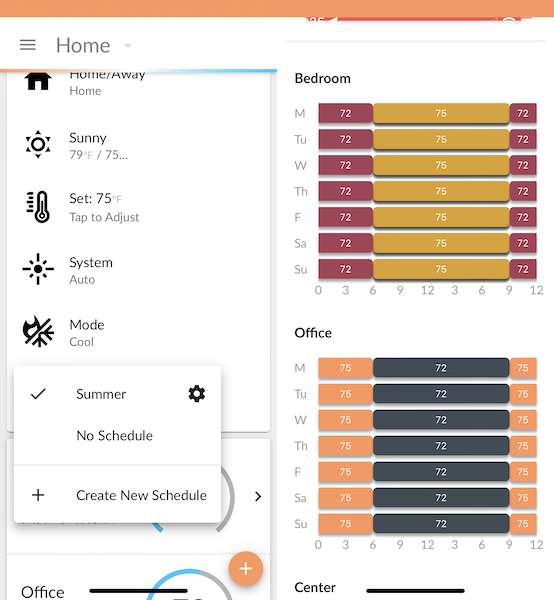
In the app, there’s a button for setting a schedule, so I decided to give that a try. What I want is to have more air in my office during the day but more in the bedroom when we sleep at night. I created a schedule called “Summer” and then added four events in it corresponding to the day and night for each bedroom. The basic idea is that I want the vents in the bedroom to be closed some during the day (starting at 6pm) and the vents in the office to be closed some during the night (starting at 9pm). The schedule feature is a bit tedious to use, but it was more than up to the challenge of creating what I wanted.
The schedule worked great the first day; everything opened and closed when it was supposed to. On the second night, however, all the vents closed, and they wouldn’t open for anything. I adjusted the schedule, changed it to auto mode, and even tried manual mode. The app said the vents in the bedroom were open, but they were actually closed.
At this point, I was screwed; I couldn’t do anything to open them. The vents stayed closed all night and all the next day, then on the third night, they magically started working again. I contacted Flair’s support, and while they graciously poured over logs and graphs, they don’t really know what happened; their best guesses were either a new feature they had recently added wasn’t working as expected or there was just a temporary glitch. On their end, it looks like everything was working fine the whole time. There are ways to reset these gadgets, as this support page shows, and if this problem shows up again, I’ll have to try this.
Thankfully, I haven’t experienced this problem again. If these sorts of glitches continue to happen, I will have to rethink my use of these smart vents, but for now, everything in the schedule is working perfectly. Once summer is over and winter arrives, I’ll have to create another schedule, one that is basically the opposite of the summer schedule. It’s very cool that Flair’s app has the ability to create this flexibility.
What I like
- Smart vents that can lower the temperature in my office
- Schedules that vary by time of day and by season
- Great tech support
What I’d change
- Ensure that the batteries in the boxes are fresh
- Support modern smart home standards, like Thread and Matter
- Respect my privacy and stop collecting data with the Flair app
- Add a physical switch to vents for times when there’s no connectivity to the pucks
Final thoughts
In previous years I had paid our HVAC contractor to do improve the duct work in our attic in an attempt to even out the temperature in our house. Nothing they changed made any difference. My office is too warm in the summer, and our bedroom is too cold in the winter. Flair’s smart vents have made a real improvement. By closing the vents in the bedroom during the day, they have lowered the temperature in my office. That feels great! Even better, the use of a schedule in the Flair app allows this automation to vary by time of day and by season. I’m glad to have their gadgets in my home.
Even so, there is still a lot of room for Flair to improve their products. I would like to see their smart vents support open standards, interoperate with other smart home gadgets, have physical switches for emergencies, and respect user’s privacy.
Price: $89 to $139 per vent (depending on size), $119 per puck
Where to buy: Amazon or Flair’s online store
Source: The sample for this review was provided by Flair.

Gadgeteer Comment Policy - Please read before commenting
There are other smart vents that come in 2 sizes, which I’d need as the Flair size would be too small for the vents in my 50 year old condo.
Raovac batteries seem to have better life. Duracell, especially those from Costco, seem to get corroded and die much earlier than the stated life, whether in use or in the package.
The fact that this relies on their servers is enough for this to be a hard “no” from me. This is something you’d want to have in your house for years, if they worked properly, and there’s no reason to believe this company will be around that long.
I agree that this is something to consider when purchasing any gadget, not just Flair’s products. And the more expensive the gadget, the most we should consider it.
I’ve been successfully using Flair for a couple of years. One tip to increase signal strength between the smart vent and the control puck is to remove the metal deflector covering the vent. I wish they (or someone) would have a plastic vent alternative.
Thank you for the tip!
I had a similar problem and upon consultation with my HVAC guy settled on a zone system for my HVAC made by the same manufacturer Lennox. It consisted of a logic board and dampers at the air handler and a smart thermostat. Expensive at about 2K installed but it worked and actually reduced my energy costs. The reason decided upon the zone system over local controlled vents is that these vents tend to set up turbulence in the ducts and actually reduce the efficiency of your HVAC system thus increase your heating/cooling costs.
An interesting solution, and not one that my HVAC company had mentioned to me. To be fair, this is not a DIY project and is considerably more expensive than the Flair vents.
Another cheap way to keep the temperatures in between rooms more balance is to turn the a/c fan “on” all the time so that when the a/c (compressor) turns off, the air still moves through the house. Keep in mind when doing this, the humidity will sometimes increase when the a/c compressor is not running and some people don’t like that also your filter will get dirty faster. ( I rather have the dirt in the filter and not in my lungs). While we are on the topic of dirty filters if you are experiencing a very dirty filter covered in fine white dust and you haven’t had any construction in your house is most likely caused by a room humidifier being used with regular water instead of distilled water.
Our HVAC had recommended that we set our Ecobee to run 10 minutes out of every hour, but I didn’t find that this did anything to help with the temp in my office.
As Bob points out, closing off vents can cause problems in many households. Vents are unfortunately often undersized, making the fan work harder to push the right amount of air. Especially if you’ve got a MERV 15+ filter. Yes closing a vent pushes more air to the right parts of the house, but pushes less air overall at higher pressure, which can be bad for the blower motor unless you’ve got ample supply vents.
I had my HVAC company add 2 extra vents, so I think I should be ok. Even so, this is a good point to consider when purchasing smart vents. Thank you!
You would be better off installing an inline booster fan with way better results and less hassle.
AC Infinity does make an inline that can be controlled via a smart app (https://www.amazon.com/AC-Infinity-CLOUDLINE-T6-Temperature/dp/B074XBXFPD), which is cool. Unlike the Flair vents, however, this is NOT a DIY project for most home owners. I would need to pay my HVAC company to come out and install one or more of these. It might be a good solution, but that’s an added cost.
As a licensed HVAC contractor, I can tell you that you need your ductwork air balanced. We use manual quadrant dampers at the takeoff collars. They are adjustable and allow you to balance the flow to each room. Much less expensive and once it’s dialed in, you don’t have to mess with it again. No batteries required, haha.
In Flair’s defense, they are far more flexible. I need different air flow in the winter than I do in the summer, and the Flair app allows me to make these changes any time I want, any season of the year. I can’t do that with dampers.