
REVIEW – Have you ever been in the middle of an epic VR session and had your session rudely interrupted by a dead battery? The only thing worse is being excited to get in there and have the system dead before you can begin. Super frustrating to be sure. Today we have two accessories from ZyberVR that make charging easier and let you get more game time. Ready to get Meta?
What are they?
The ZyberVR Charging Dock gives your headset and controllers a home base that all but guarantees they’ll be charged for your next session. The Battery Head Strap replaces the stock head strap and extends your game time with an additional 6000mAh battery.
What’s in the boxes?
These products are sold separately and here’s what’s in each box.
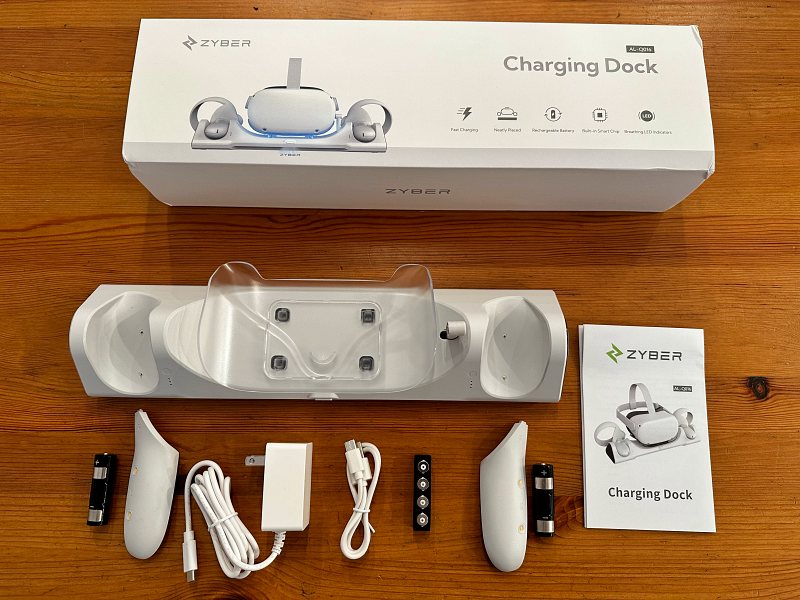
- Charging Dock
- 2 AA rechargeable batteries and cover panels for hand remotes
- 4 USB-C Adapters for use with Dock
- Power Adapter and USB-C to USB-A cable
- Manual
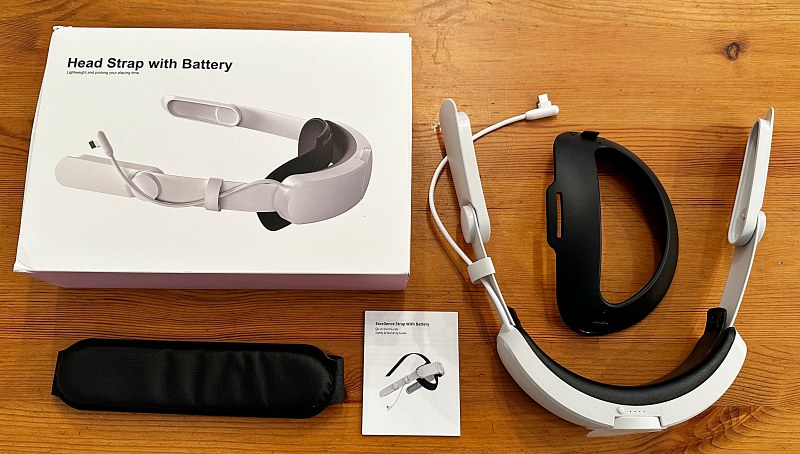
- Battery Head Strap
- Rear Brace
- Cushioned Top Strap
- Manual
Hardware specs
Charging Dock
Batteries: (2) AA 1800mAh Ni-MH batteries
Charge time: 2.5-3.5 hours (headset) | 4 hours (controllers)
Protection:Over-current, Over-charge, Over-current, and Short-circuit protection
Dock Input: 5v 3A
Headset Output: 5v 1.5A Max
Controller Output: 1.5v 650mA
USB-A Output: 5v 3A
Device Retention: Magnetic
Footprint: 14 x 4″ empty or 16.25 x 12″ with controllers and headset (w/ strap tightened)
Battery Head Strap
Battery: 6000mA
Charge time: ~5.5 hours
Run time: 5-8 hours of use
Protection: Over-temp, Over-current, Over-charge, Over-current, and Short-circuit protection
Input/Output: 5v 2A
Design and features
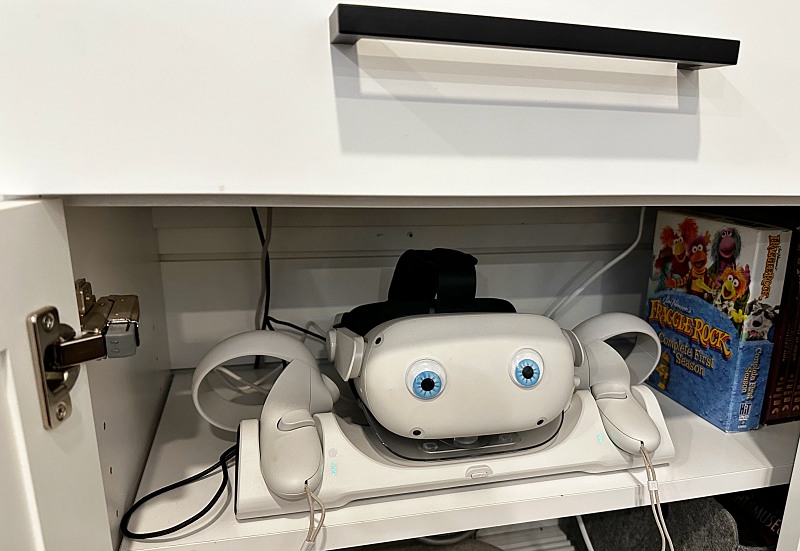
The ZyberVR Charging Dock is designed to charge the headset and both controllers without needing to swap batteries or plug in cables. It also gives them a home so things can stay organized.
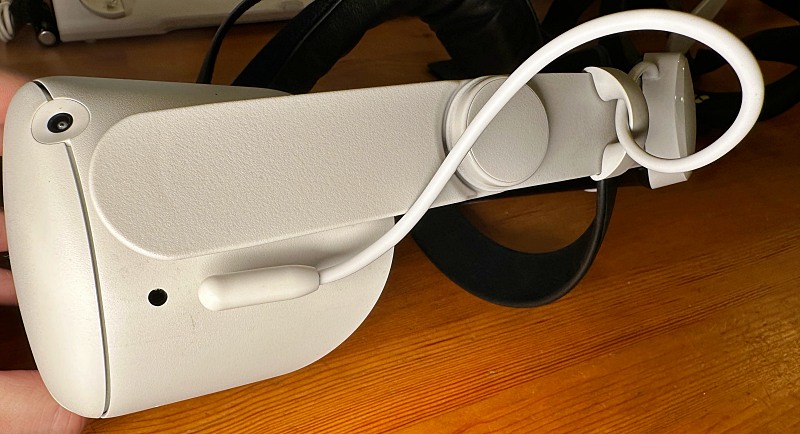
The ZyberVR Battery Head Strap replaces the elastic strap on your Quest 2 with one that’s faster to put on and provides a whole bunch of power to let you game longer.
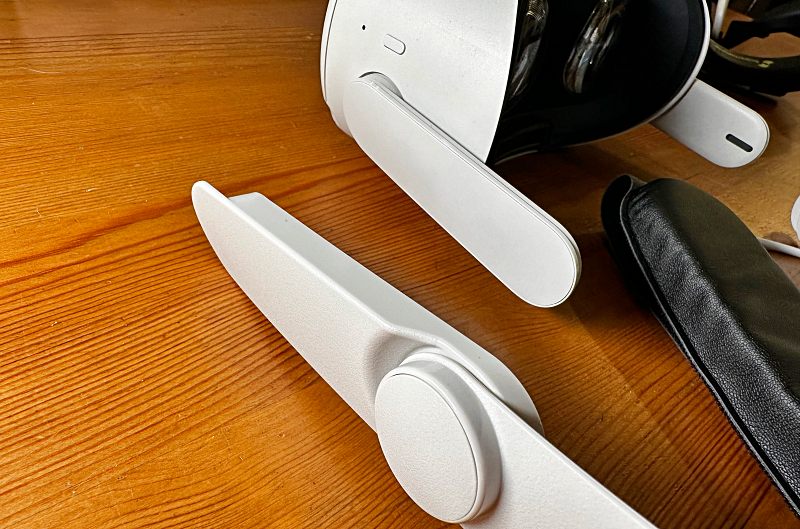
A key design feature that is extremely handy is the pivot added to the side of the strap. It allows a 52º bend which makes it easier to put the headset on or take it off. ZyberVR’s marketing image shows a user pivoting up the headset. I found that tilting the head strap up instead lets me slide the headset straight over my glasses, perfectly place it on my face, then rotate the strap down and tighten it up. I can reverse the process for taking them off. It’s a significant improvement and I won’t go back.
Setup
Let’s set up the ZyberVR Charging Dock first.
Place the base where you want to store (and charge) your Quest 2. Make sure you’ve got enough depth and width with the controllers and headsets in their locations. Connect the power adapter to the back and to a wall outlet.
Remove the battery covers on your controllers. Replace the batteries with the new rechargeable batteries, making sure that the silver panels are facing up. This lets the pogo pins inside the new covers make contact for charging purposes.
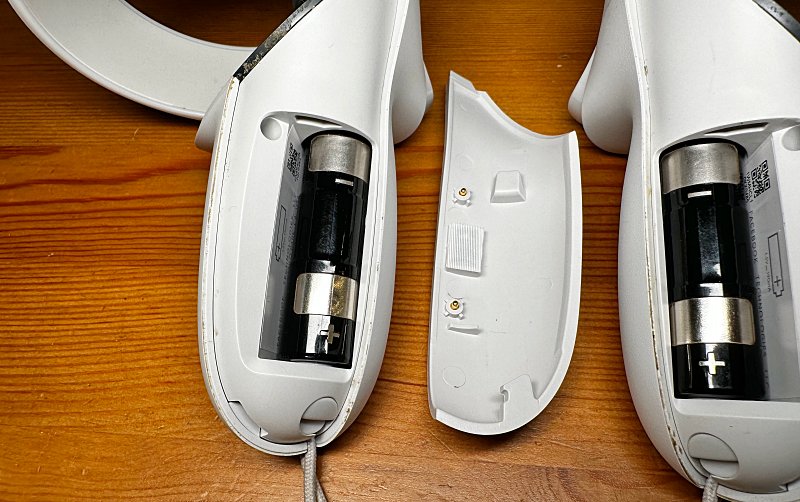
Install the new covers, and then place the controllers onto their new charging spots on the sides of the base. They are left and right specific, so place them correctly.
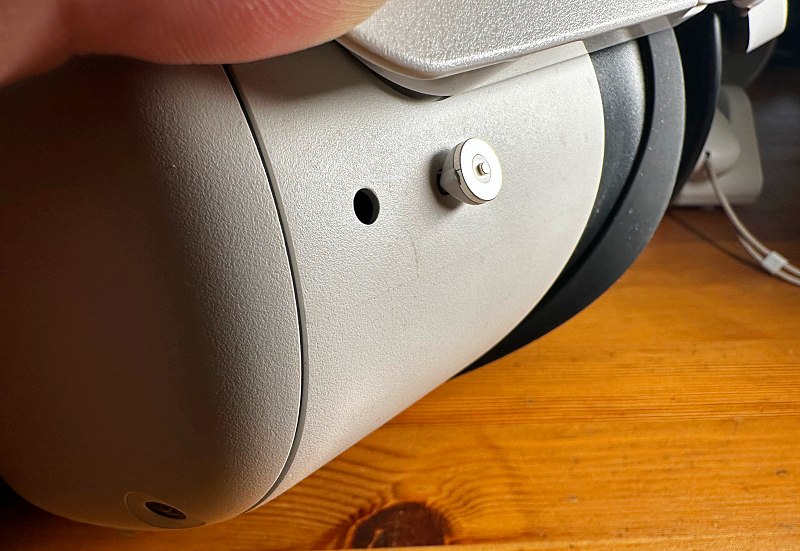
Install one of the USB-C magnetic adapters into the USB-C charging port on the side of your Quest 2 headset. This interacts with a pivoting magnetic charging post in the base. Keep an eye on it as you place the headset onto the center of the charging base and you’ll see it in action. It looks like this…
Now that your headset and controllers have a home, they’ll always be charged and ready to go.
Setting up the ZyberVR Head Strap is slightly more involved, but still easy.
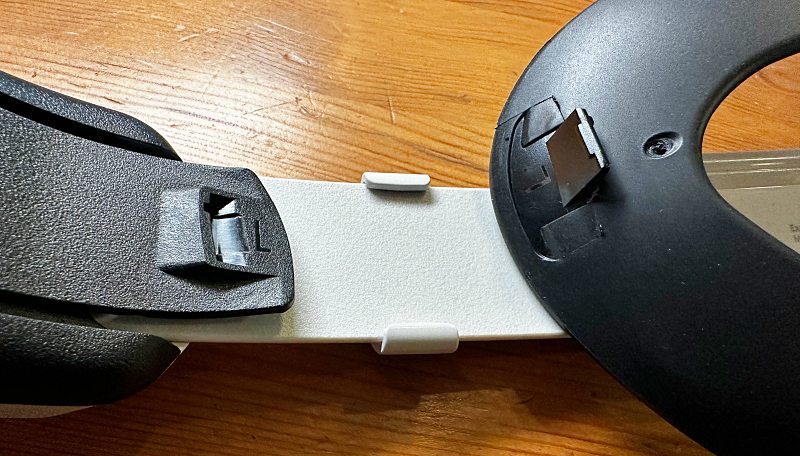
Install the rear brace by aligning the small posts with the receivers on the inside of the battery strap. You’ll hear a click as they seat properly.
Install the cushioned top strap into the slot with the smooth side down and then close the velcro flap back onto itself.
Remove the face insert from your headset to allow a little more room to work. Detach the current head strap from the top of the headset and from the sides by pulling outward.
Install the charging headband by snapping on the two sides and then connecting the USB-C cable from the headset into the charging port on your headset.
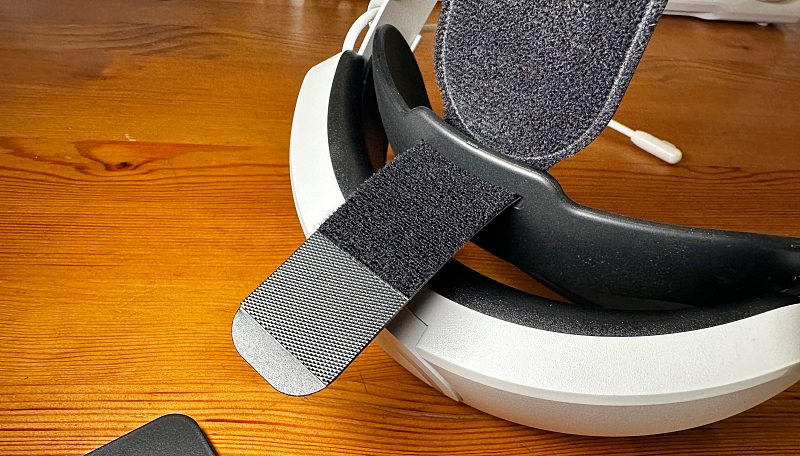
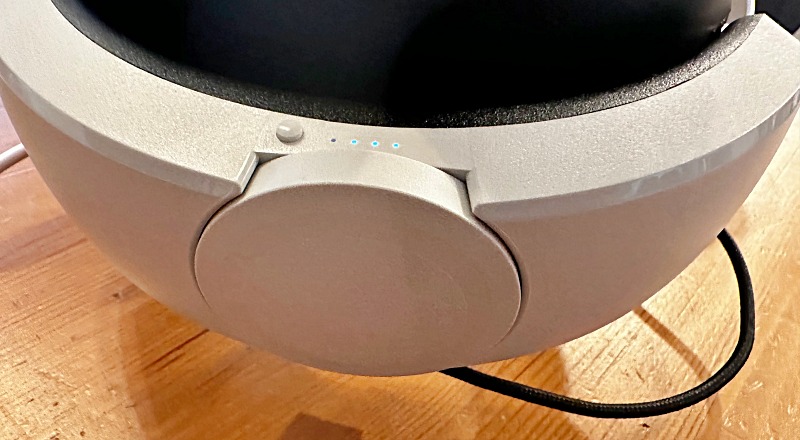
Install the front of the top strap through the slot and close the hook velcro on itself. You can now adjust the size of the headband by using the dial on the back and then adjusting the top strap to help keep pressure off your nose. There’s quite the adjustment range.
To charge your headset here forward you need to connect the USB charging cable to the port on the underside of the battery at the back of your new headband.
There’s one button at the top of the battery. Press it once to provide power to the headset. Press it twice to turn off. Make sure you press once before charging to allow both the headset and the strap battery to charge. Note that this power button has little to no tactile feedback so watch for the lights to indicate that you’ve pressed it.
Performance
Okay, so if you just read through the setup stuff, you might be scratching your head thinking, wait… didn’t I just install a USB-C magnetic adapter, and a USB-C cable from a battery strap into the same USB-C charging port on my headset? The answer is yes. The two products are kind of incompatible in that regard, but let’s put a pin in that for a moment. I promise to circle back around. Let’s assume for a moment we’re using one product or the other.
ZyberVR Charging Dock
This works exactly as it should. The controllers locate easily thanks to some magnets and begin charging. Each side has 3 LEDs that individually light up blue while charging and then all 3 turn green as the controller near a full charge.
The headset locates well and the magnetic charging post connects instantly. The edge of the clear tray it sits on immediately light us green and then switches to blue while charging. You’ll also notice a little ZYBER logo that’s projected down from the front of the dock.
If the lights aren’t your thing, Zyber graciously provides a button to turn them off. Keep in mind that with them off, only the charge LED on the headset will indicate that it’s working. That’s no different than using the standard cable so not a big deal.
I know connecting cables isn’t hard to do, but it’s really easy to forget to do it. Keeping an eye on the batteries in the controllers is a little more abstract. Those two things together make this product almost a must.
ZyberVR Battery Head Strap
Now this one is super interesting. More time to game before running out of battery? Sign me up! But wait, how much does it weigh? Well, that’s the interesting part. The stock strap (elastic/velcro only) weighs 1.6oz or 48g. The Quest Elite strap is heavier at 6.1oz or 172g. The ZyberVR Battery Head Strap at 11.7oz 335g, obviously weighs more due to the built-in battery.
However, all that extra weight is all at the back counter-balancing the weight of the headset itself. I wear glasses and have to use the additional spacer between the face insert and headset. It only adds ~2mm, but further off my face where I feel the weight on my nose, so I have to crank down the strap or both. The Zyber is significantly more comfortable on my nose as a result, plus I don’t have to crank it down as tight.
Prior to receiving the Zyber, I had already switched to the Quest Elite strap, and it’s clearly where Zyber borrowed some of the design functionality. The dial at the back lets you easily tighten the strap with one hand, and the sliding cable retention keeps that cable from dangling down near your ear.
Using both the ZyberVR Charging Dock and the ZyberVR Battery Head Strap
The controllers still charge like their supposed to so let’s leave them out of the discussion. Okay, so let’s address that head scratching moment. With the Battery Head Strap installed, your Quest 2 still fits in the Charging Dock, but the extra weight on the back changes the balance so the headset tilts back such that even if you had the magnetic adapter in place instead of the new strap’s charging cable, the pivoting magnetic arm is in the wrong spot. No good.
Here’s the solution I came up with. I already had some USB-A magnetic cables that I had purchased for charging wireless keyboards and mice. I used the magnetic USB-C adapter from one of those (very similar to the one provided by Zyber) into the battery port on the underside and then connected the cable to the USB-A port on the back of the dock. This photo has the headset upside down to show the cable.
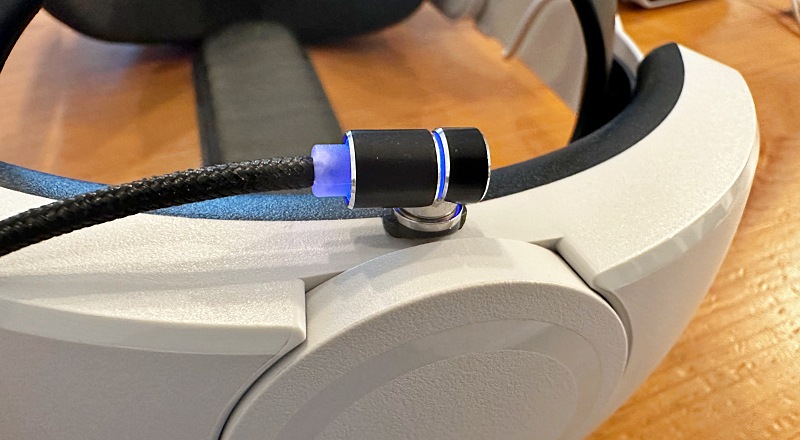
Now I just need to make sure that the magnetic cable jumps into place as I’m placing my headset down and click the power button on the battery once to make sure both it and the headset are charging.
Definitely feels like something ZyberVR should have figured out, but I have to say it’s working really well. I will note that the main lights do not function without that pivoting magnetic connector so keep that in mind.
What I like
- Having a charged headset and controllers every time
- Better headset weight balance and less pressure on the nose
- The pivot on the strap massively improves getting the headset on and off
- Having a specific home for the controllers and headsets
- No more swapping batteries on the controllers
What I’d change
- A firmware change to allow the charging dock lights to blink a couple times at charging start if you have the lights switched off
- Better tactile feedback (aka button travel) on the Head Strap power button
- An official charging solution for anyone wanting to use these two products simultaneously
Final thoughts
Both ZyberVR products work great independently. The dock loses some functionality if you try to use them together as the required cable of the Battery Strap negates the headset charging function of the dock. I found a solution that works for me where everything is charged and there’s plenty of game time. It will be interesting to see if they can design a complete system for both parts that don’t require a work-around.
Prices: $52.99 and up
Where to buy: Zybervr.com and Amazon
Source: The sample of this product was provided by Zyber VR.
